Hands-on: scheduled delta replication flows in SAP Datasphere
Step by step: stop a delta replication flow running 24/7 with At Scheduled Time, a task chain, a cron schedule and proper validation in SAP Datasphere.
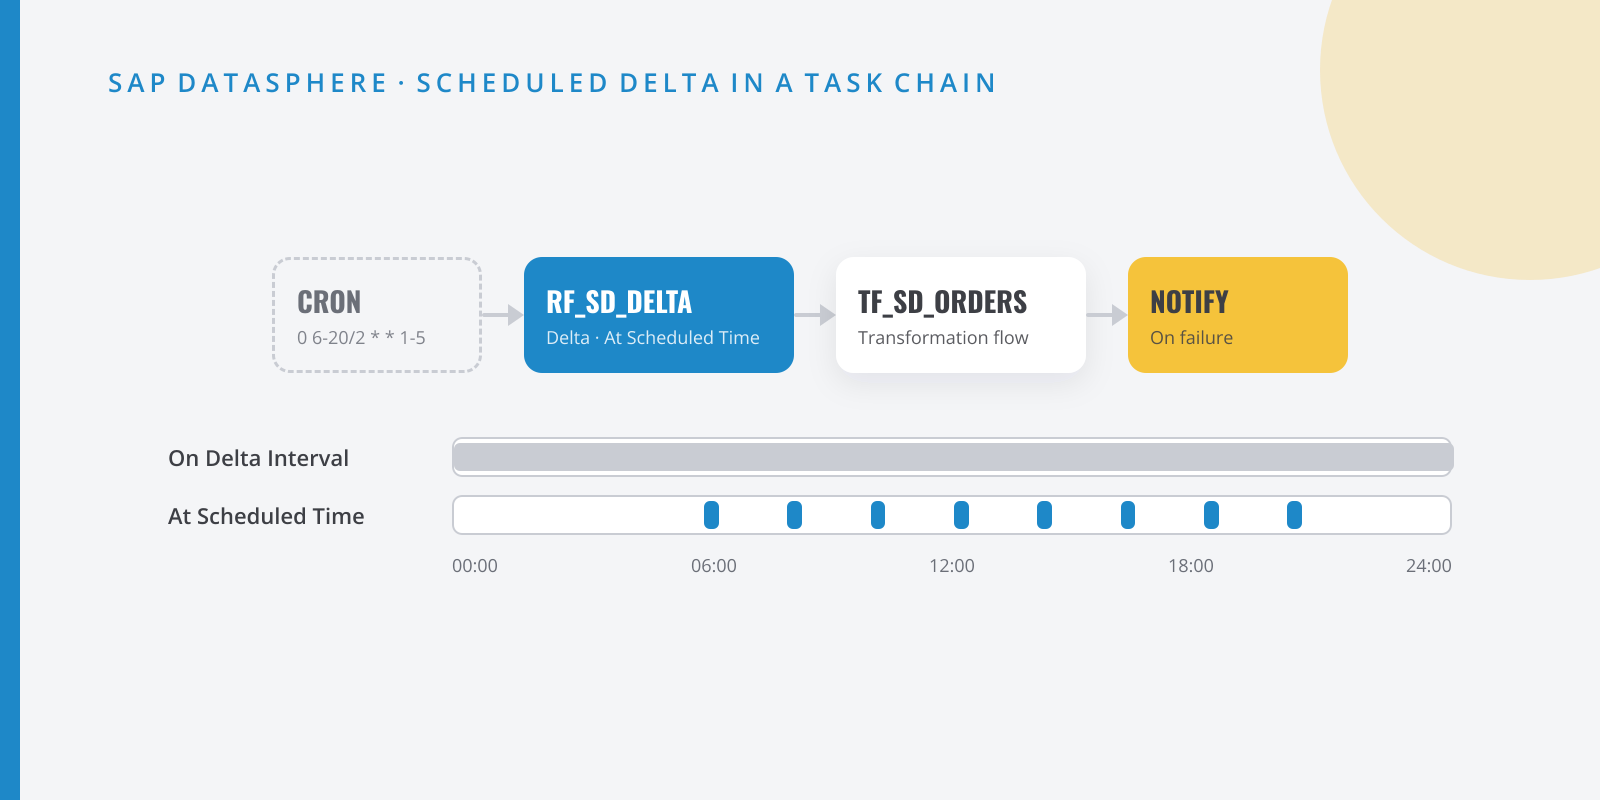
Table of contents
Until recently, a delta replication flow in SAP Datasphere was a long-running task: it stayed Active forever, checking for changes every few minutes. It works, but it has two drawbacks that hurt in real projects. You could not chain it with whatever comes next (transformations, persisted views), and it burns execution hours all day, even when the business only looks at the data during office hours. Since May 2026, Datasphere can run the delta when you decide and then stop. In this hands-on guide I build the whole setup end to end.
What we are going to build
By the end you will have:
- A replication flow
RF_SD_DELTAthat reads two standard S/4HANA CDS views with Initial and Delta and the new At Scheduled Time run mode: it processes pending changes and completes. - A separate replication flow,
RF_SD_MASTER, holding master data as Initial Only. - A task chain
TC_SD_INTRADAYthat runs the delta, then a transformation flow that builds the reporting table and, if anything fails, sends a notification. - A cron schedule: every two hours, from 6:00 to 20:00, Monday to Friday.
The cover image sums it up: on top, the chain we are building; below, the difference between one job running all day and short runs during the hours that matter.
The Datasphere object names (SD_INB, S4_CLOUD_PUBLIC, RF_SD_DELTA…) are examples; use your own naming convention. The CDS views, on the other hand, are SAP standard.
Why it is worth it
SAP’s documentation is blunt about it: replication flows are billed by job duration, not by the number of records. A delta running 24 hours consumes 24 hours, whether or not anything changes in the source. If your users look at sales in the morning and mid-afternoon, paying for the small hours makes no sense.
The second benefit is orchestration, and to me it matters even more. With a long-running delta, anything downstream (a transformation flow, a persisted view) gets scheduled by guesswork, hoping the delta has already gone through. With At Scheduled Time the replication flow ends, so it can sit inside a task chain and the next step starts once the data is there. That is what we did in BW with a process chain and a delta DTP, and what many of us missed in Datasphere.
Step by step
Step:Split delta objects from Initial Only objects
The first rule, and the one people trip over most: a replication flow that mixes Initial Only and delta objects cannot be scheduled or added to a task chain. SAP asks you to split them into two flows: one with only Initial Only objects and one with only delta objects set to At Scheduled Time.
In the example:
Replication flow Objects Load type RF_SD_DELTAC_SalesDocumentItemDEX_1,C_BillingDocItemBasicDEX_1Initial and Delta RF_SD_MASTERI_Customer,I_ProductInitial Only If you already run a mixed flow in production, now is the time to split it. I would also group by frequency: what the business needs every two hours in one flow, what a nightly load covers in another.
One limit to keep in mind when grouping: according to SAP’s documentation, a replication flow can hold at most 500 objects. Long before reaching that, I would already split by area or frequency, so that one failure or reload does not drag everything else down.
On which views to read: the view must be enabled for extraction (annotation
@Analytics.dataExtraction.enabled) and, for delta, support change data capture (CDC). For transactional data, SAP ships dedicated extraction views such asC_SalesDocumentItemDEX_1orC_BillingDocItemBasicDEX_1; for master data, basic views such asI_CustomerorI_Productusually do the job. A Z view only makes sense when nothing standard covers the case, and then built on released views with its own extraction and delta annotations. Before you start, check in your system that the views exist and that your release includes them.Step:Create the delta replication flow
In the Data Builder of space
SD_INB, create a new replication flow:- Source connection:
S4_CLOUD_PUBLIC(SAP S/4HANA Cloud connection type), containerCDS_EXTRACTION. Use the + next to Source Objects to addC_SalesDocumentItemDEX_1andC_BillingDocItemBasicDEX_1. - Target: SAP Datasphere. The target is always a local table in the current space; if it does not exist, it is created on deployment.
- Load type: Initial and Delta. You can set it for every object on the editor’s Settings tab or object by object in the Object Properties panel.
For this load type SAP recommends a target table with Delta Capture enabled. Take the advice and switch it on in the Settings section of each object’s Object Properties panel, next to Load Type (Datasphere proposes
<object>_Deltaas the change table): it is what lets the transformation flow in step 5 read only the changes. If you map to an existing table, remember Delta Capture can only be switched on before the table is first deployed.Save as
RF_SD_DELTAand deploy.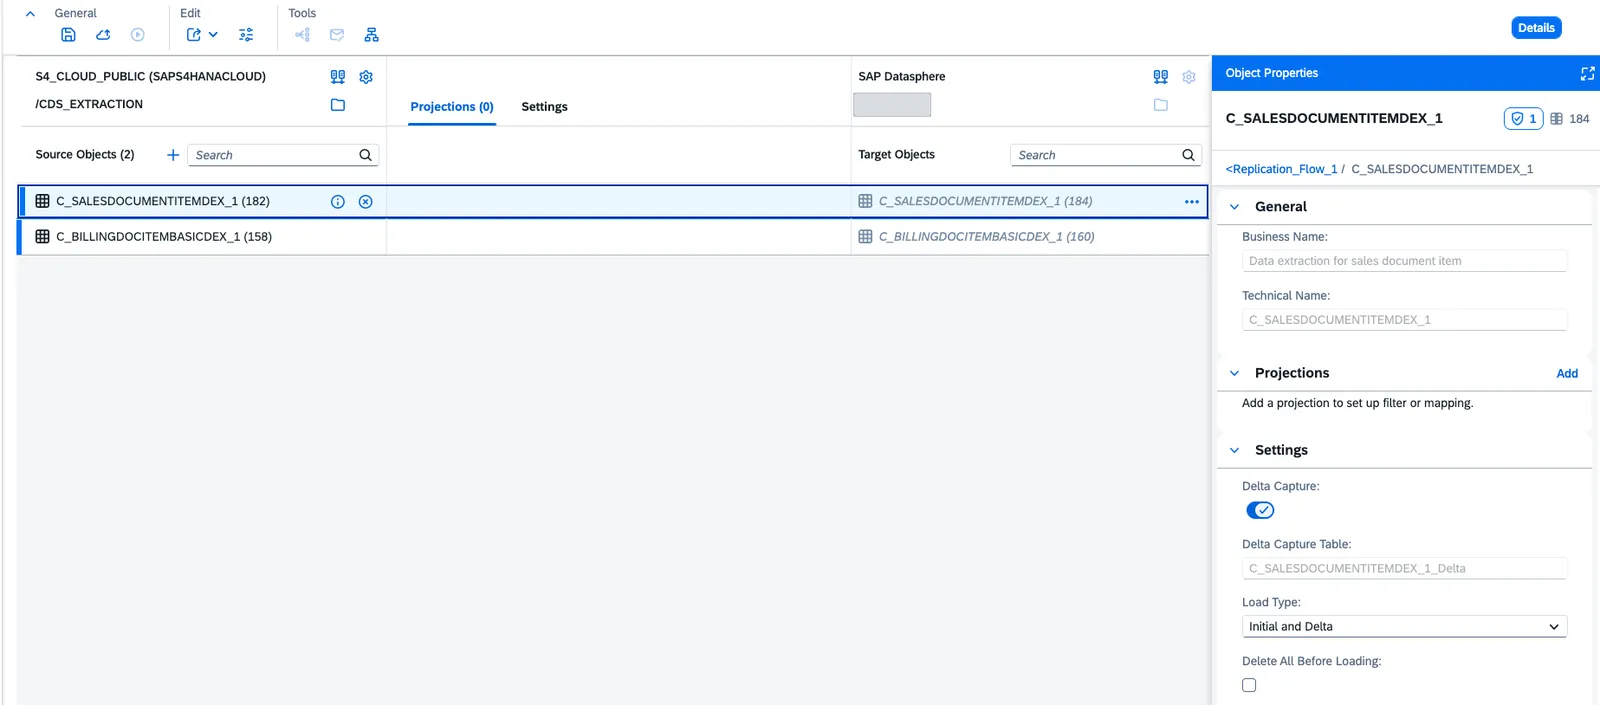
Replication flow editor: the two delta objects and, in Object Properties, Delta Capture (1) and Load Type = Initial and Delta (2). - Source connection:
Step:Set Delta Load Run to At Scheduled Time
In the Replication Flow Properties panel, scroll down to the Run Settings section. The key option is Delta Load Run, and you can already set it in the editor, before deploying. Once the flow is deployed, the section turns read-only with an Edit link; according to SAP, changing it there requires the DW Integrator role.
- On Delta Interval (default): the classic behaviour. The flow runs continuously and checks for changes based on the Delta Load Frequency, 60 minutes by default.
- At Scheduled Time: the flow processes the available changes and completes. This is what lets you run it manually, on a schedule or in a task chain.
Choose At Scheduled Time. The Delta Load Frequency no longer applies: the schedule sets the pace.
In the same section, under Thread Limit for Initial Load, check the Source/Target Thread Limit (1 to 160; 10 by default). Two CDS views do not need changes; for large objects, raise them carefully, because replication flow jobs are shared by every flow in the tenant.
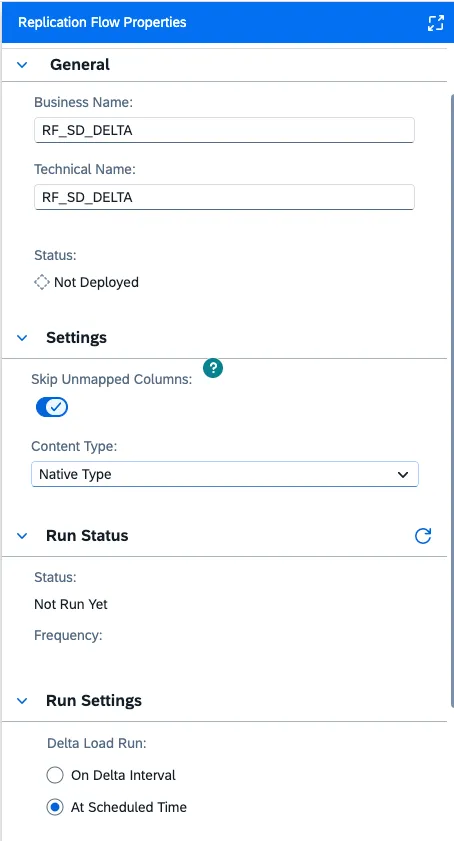
Run Settings in the replication flow panel, with Delta Load Run = At Scheduled Time (1). Step:Build the Initial Only master data flow
Repeat step 2 with
I_CustomerandI_ProductinRF_SD_MASTER, using load type Initial Only and Delete All Before Loading switched on so each run replaces the data. Deploy. This flow goes into its own nightly chain, so keep it out of the intraday one.Step:Create the reporting transformation flow
TF_SD_ORDERSreads only the changes from the item table thatRF_SD_DELTAloads and writes them to a reporting table,SD_ORDERS_RPT. That way, sales order items travel in delta end to end: from S/4HANA to the reporting table.- In the Data Builder of space
SD_INB, choose New Transformation Flow and then Graphical View Transform. - Drag in the local table
C_SalesDocumentItemDEX_1as the source: the one the replication flow created with Delta Capture switched on. - Add a projection (Rename/Exclude Columns) and keep the columns reporting needs:
SalesDocument,SalesDocumentItem,NetAmountand whichever others you use. Keep the change columns (Change Type and Change Date): SAP requires them to be mapped to columns of the same type in the target. - Go back to the transformation flow editor with Back and, on the target node, choose Create New Target Table. Call it
SD_ORDERS_RPT. Because the source has Delta Capture, the target gets it switched on by default: leave it that way. Check under Mappings that the automatic mapping by name has linked every column. - In the properties of the transformation flow itself (General section), set Load Type to Initial and Delta. SAP only allows this when Delta Capture is on for both source and target. The first run loads everything; later runs load only the changes.
- Save as
TF_SD_ORDERSand deploy.
I kept it deliberately simple, and not out of laziness. SAP’s documentation sets three limits worth knowing before you make it more complex:
- Only one source table with Delta Capture per transformation flow, and delta can only be read from tables, not from views.
- No aggregations when the target has Delta Capture, because the change columns must be passed through as they are.
- Be careful with joins. With an inner join, deletions in the source do not reach the target. And if you join with
I_Customer, a change to the customer does not create a delta on the items: you would have to reset the watermark to reload.
That is why I would enrich with customers and products further up, in a view or in the Analytic Model that reads
SD_ORDERS_RPT, not inside the transformation flow.What about billing?
RF_SD_DELTAalso loadsC_BillingDocItemBasicDEX_1, but it cannot go into this same transformation flow, because it only accepts one source with Delta Capture. It needs its own, for exampleTF_SD_BILLING→SD_BILLING_RPT, built exactly the same way. In the task chain in the next step it runs in parallel withTF_SD_ORDERS, both hanging off the replication flow. To keep the guide short, I continue with orders only.A useful operational detail: the watermark, the timestamp up to which data has been loaded, is shown in Monitoring > Data Integration, on the Delta Capture Settings tab of the transformation flow. From there you can choose Reset Watermark to force a full reload on the next run without redeploying.
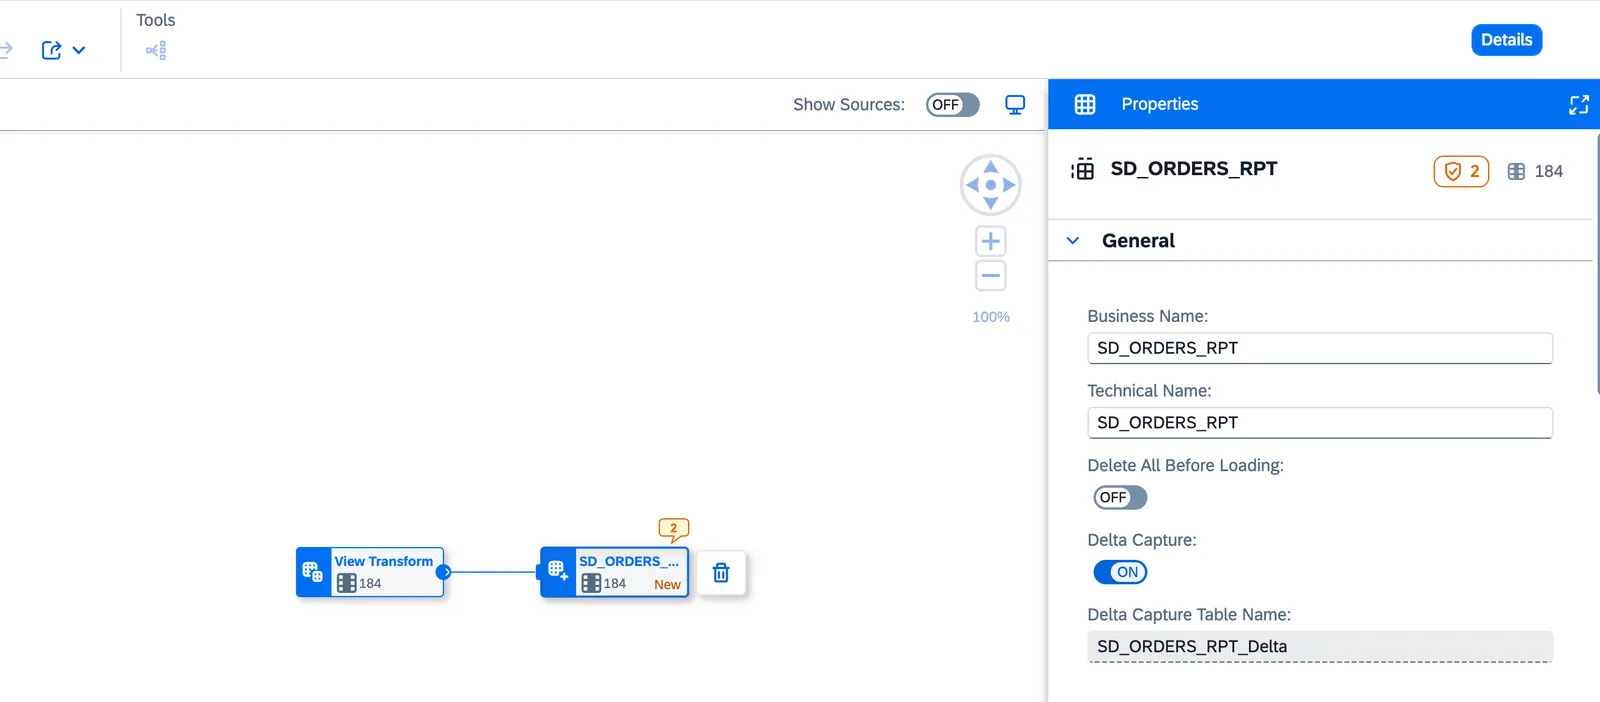
SD_ORDERS_RPT target node: Delta Capture switched on (1), inherited from the source. 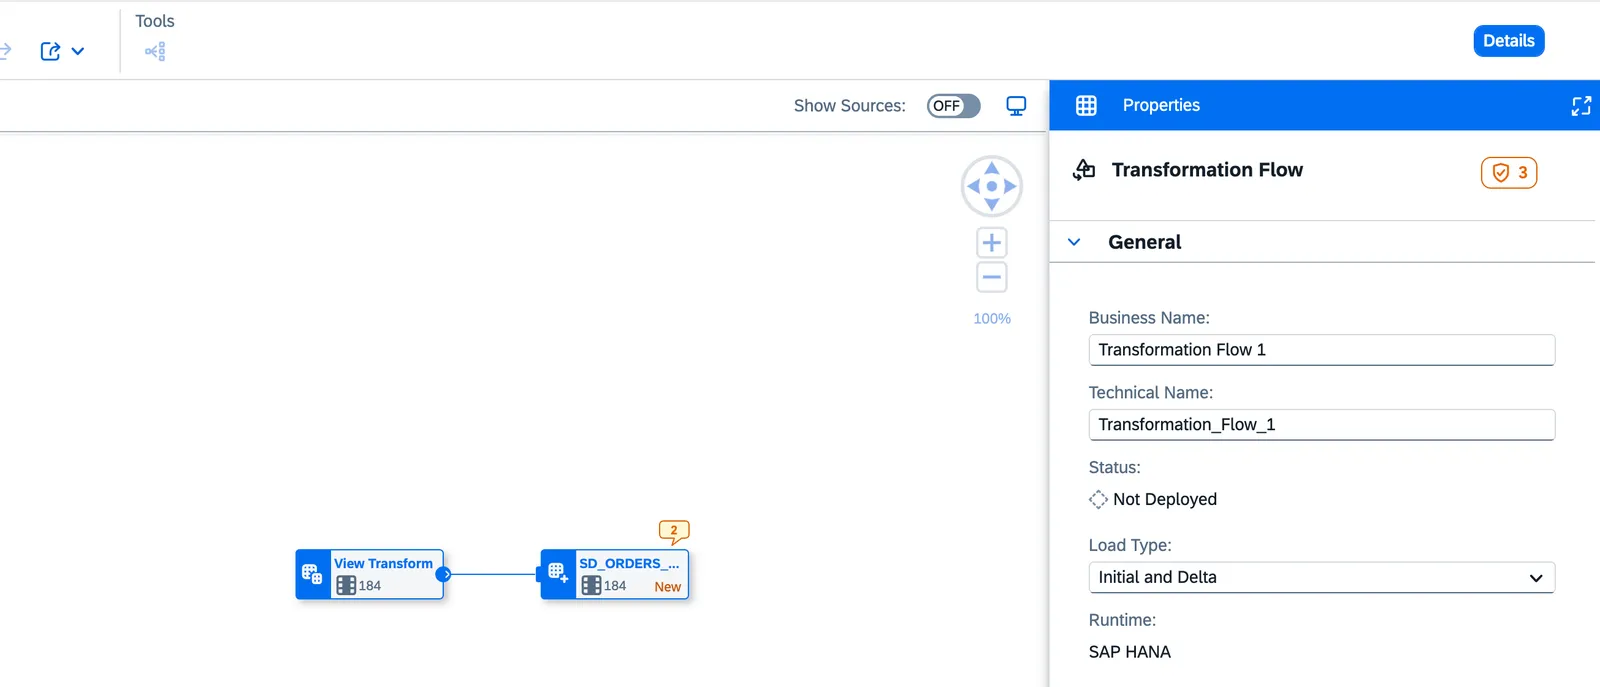
Transformation flow properties: Load Type = Initial and Delta (1). - In the Data Builder of space
Step:Create the intraday task chain
In the Data Builder, choose New Task Chain and drag from the Repository tab:
RF_SD_DELTA, shown as the activity Run Replication Flow.- Dropped onto the previous one with Add as New Task, the transformation flow
TF_SD_ORDERSfrom the previous step (Run Transformation Flow). The default link is the Success port (✓): it only starts when the replication flow has finished successfully. - A Notification Task from the task chain toolbar (shown as Send Notification), linked to the replication flow’s error port (✕) so the team is told when something fails.
Select
TF_SD_ORDERSand, in its properties panel, switch on Enable Auto-Retry (the Runtime drop-down): one to three retries, waiting between 15 seconds and 5 minutes between attempts. Note that, according to SAP’s documentation, neither replication flows nor the notification task support auto-retry. IfRF_SD_DELTAfails, for example because of a network glitch with S/4HANA, it is not retried automatically: that is what the notification is for.Save as
TC_SD_INTRADAYand deploy. Then set up the chain’s completion email notification.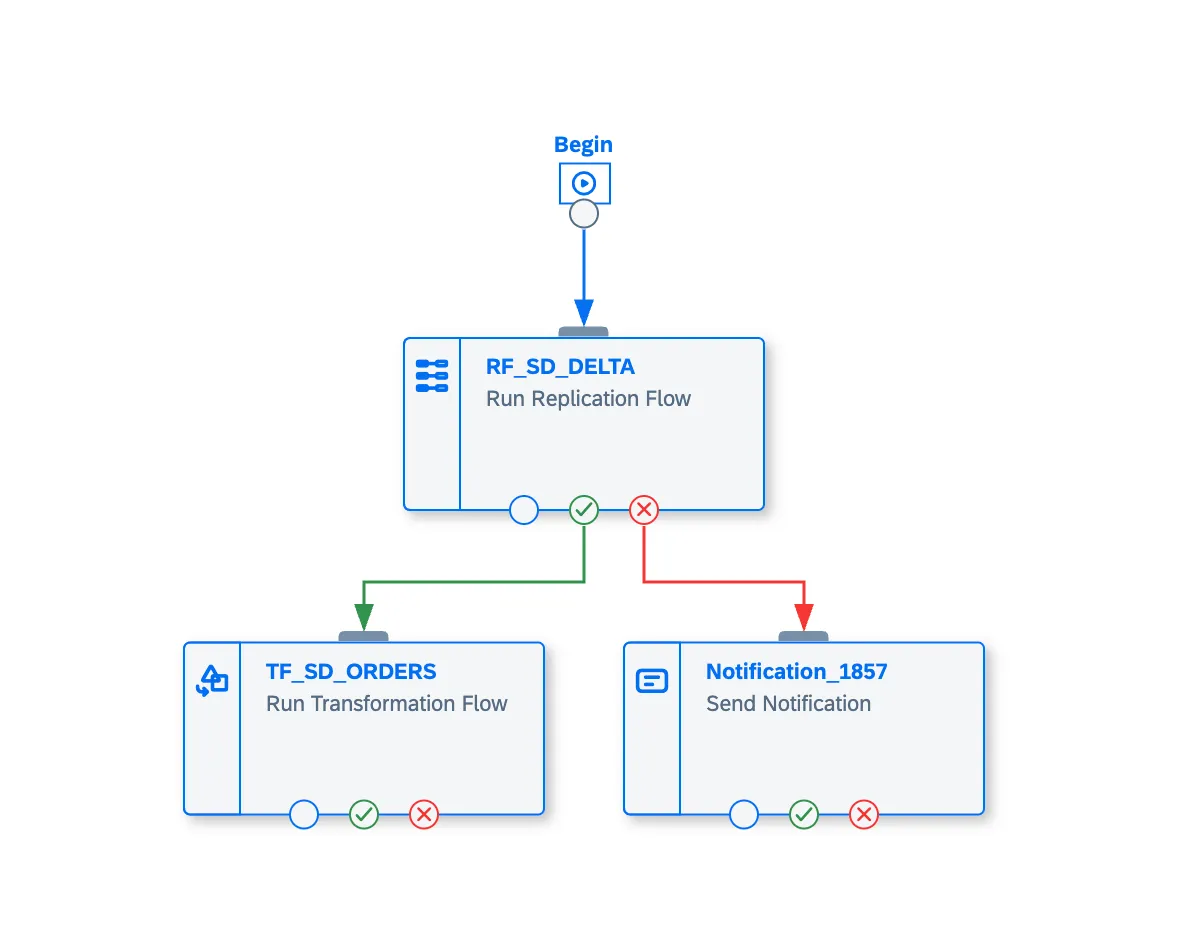
TC_SD_INTRADAY: the transformation flow hangs off the replication flow's success port and the notification off its error port. Step:Schedule the chain with cron
First, check in your profile (Authorized Consent Settings) that you have given scheduling consent. Without it, scheduled tasks you own fail. Consent lasts 365 days and you get an email 30 days before it expires.
In Monitoring > Data Integration, pick the space, open the Task Chains tab, select
TC_SD_INTRADAYand choose Schedule > Create Schedule. Under Setting Type pick Cron Expression, under Time Zone your region (Europe/Madridin the example) and fill in the five fields (Minute, Hour, Day (Month), Month and Day (Week)) with:cron TC_SD_INTRADAY 0 6-20/2 * * 1-5It reads: minute 0, every two hours between 6 and 20, any day of the month, any month, Monday to Friday. The dialog’s Next Runs panel lists the upcoming runs: use it to check the expression does what you think before you click Create. Datasphere uses the five-field unix-cron format, and the minute field only takes a single value, with no ranges or steps.
Schedule the chain, not the standalone replication flow. Schedule both and you get duplicate runs. For
RF_SD_MASTER, create another chain,TC_SD_NIGHTLY, with its own schedule, for example30 1 * * *.A production tip: in the dialog’s Ownership section, make a technical user the schedule owner rather than yourself. The day you move to another project, the loads should not depend on your consent.
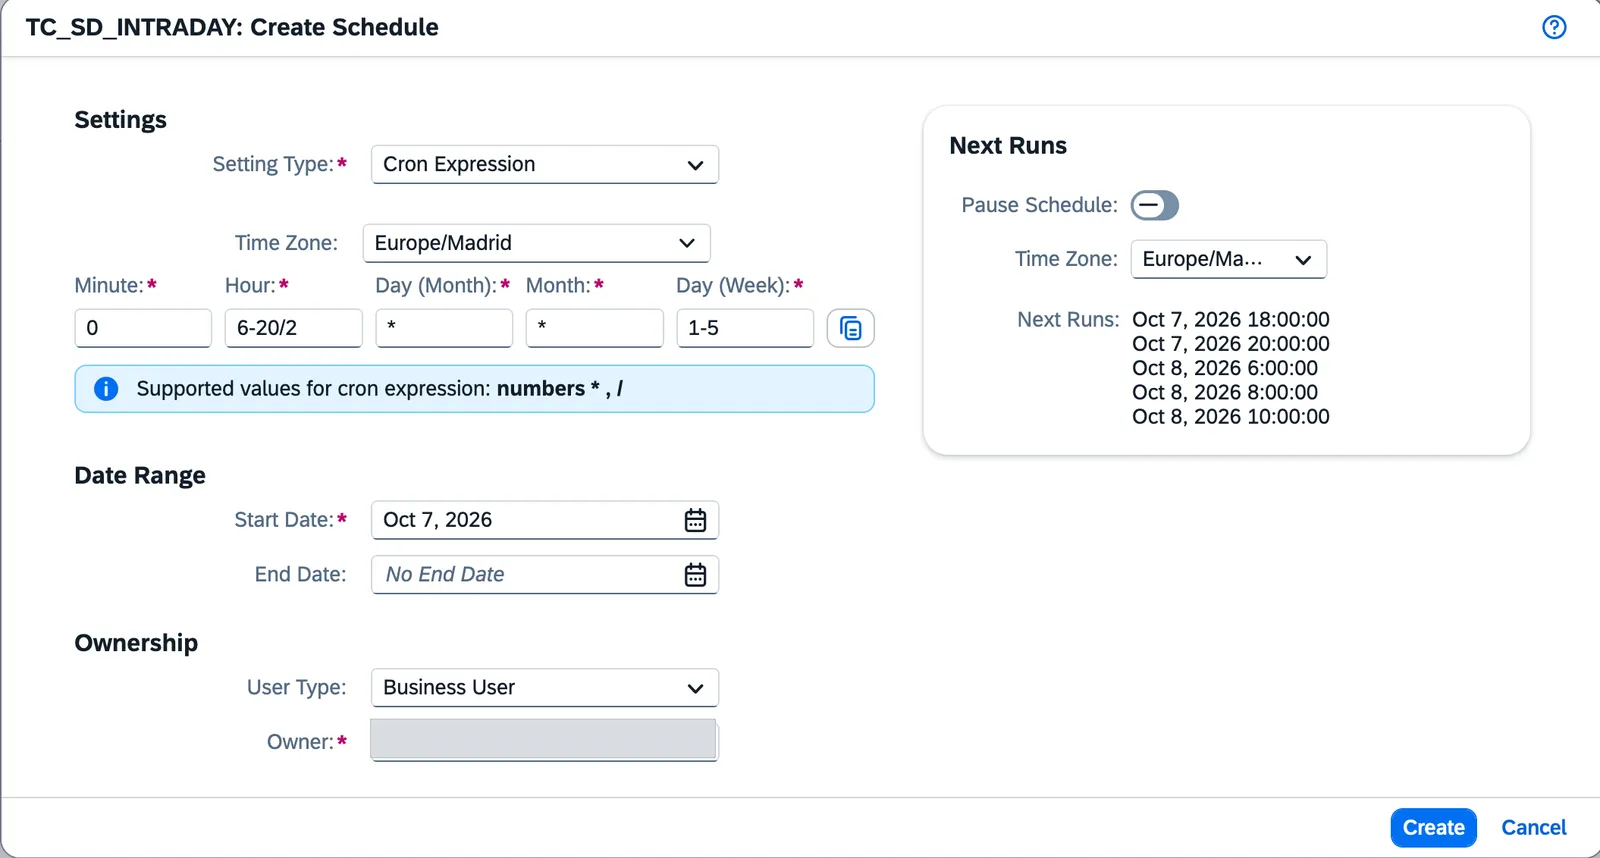
Create Schedule with the cron expression split across its five fields and, on the right, the upcoming runs. Step:Include the run setting in the transport
This step gets forgotten and breaks the move to production. Run settings do not travel on their own: in Monitoring > Data Integration > Flows, open the details of
RF_SD_DELTAand, in the Transport panel, tick Include Delta Load Run (or Include all settings).If you skip it, the flow lands in the production tenant with the default, On Delta Interval, and you cannot schedule it or run it in the chain. SAP also notes that run settings only travel through the Transport app (ACN), not through standalone JSON export and import.
Validation
Run the chain manually once (Run from the monitor) and check four things:
-
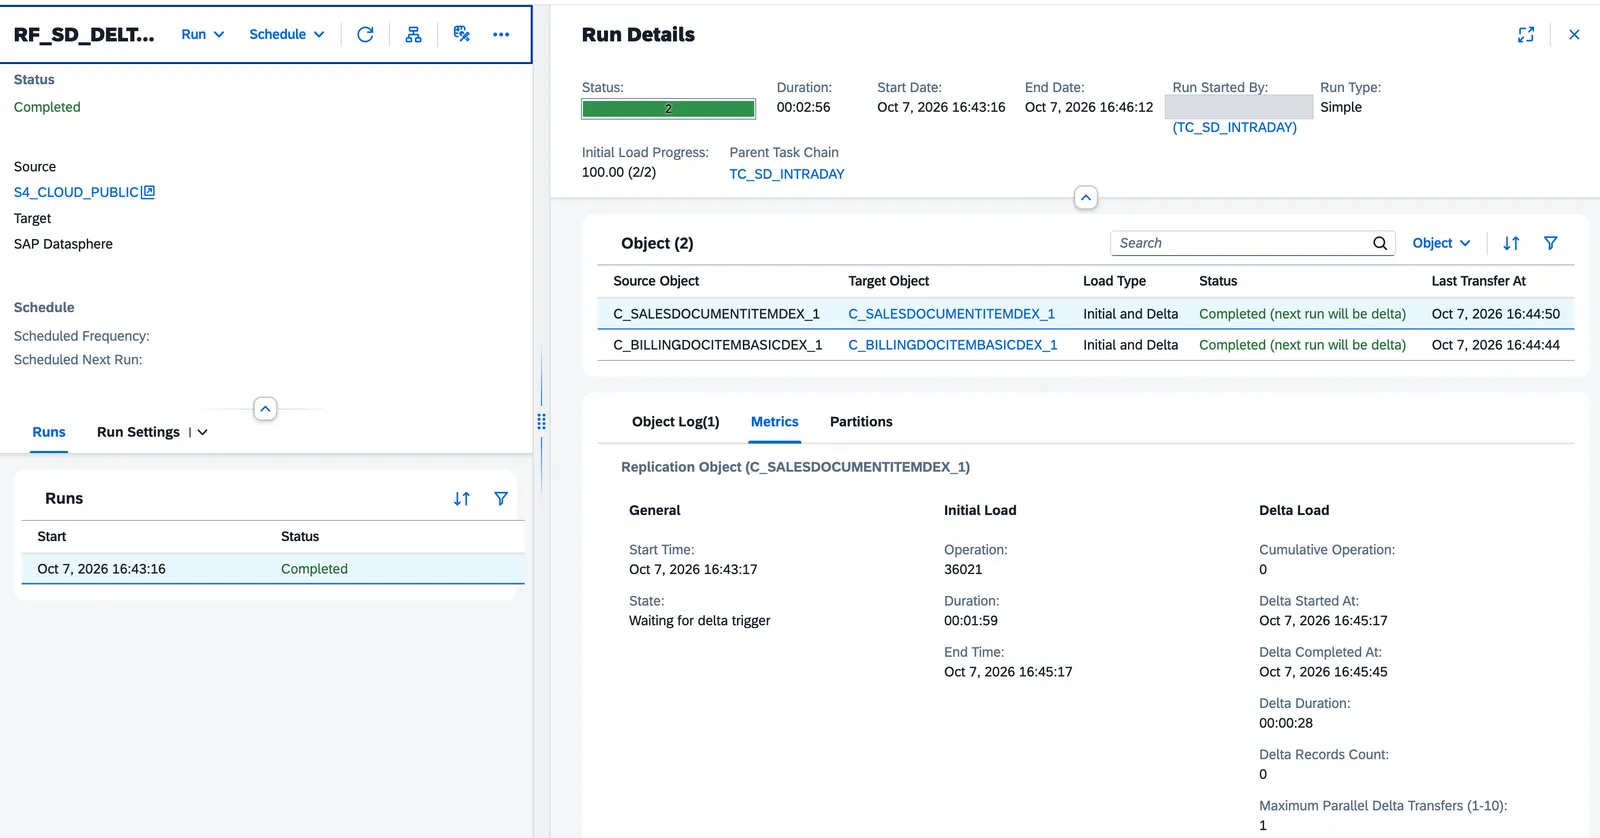
The replication flow completes. In Monitoring > Data Integration > Flows,
RF_SD_DELTAshould end as Completed, and in the run details each object should show Completed (next run will be delta). If it stays Active, it is still on On Delta Interval. -
The chain moves on. In the task chain monitor,
TF_SD_ORDERSshould start after the replication flow, not in parallel. -
The numbers match. Create a simple SQL view on the target table and compare the items of a test sales order with S/4HANA:
V_CHECK_SD_DELTA.sql SELECT"SalesDocument",COUNT(*) AS "ITEMS",SUM("NetAmount") AS "NET_AMOUNT"FROM "C_SalesDocumentItemDEX_1"WHERE "SalesDocument" = '0000012345'GROUP BY "SalesDocument"Use your target table name if you renamed it, and a real order from your development system. Change one item of the order in S/4HANA (quantity or price), run the chain and confirm that
NET_AMOUNTmoves and the item count still matches. Repeat the query withSD_ORDERS_RPTin theFROMclause: it should return the same, because the transformation flow has propagated the change. -
Cost goes down. After a few days, check the replication flow execution hours for the space in the capacity unit monitor. You should see short runs in your time slots and nothing outside them.
Common mistakes
| Symptom | Cause | Fix |
|---|---|---|
| The flow does not show up when adding it to the task chain, or the schedule cannot be created | It is still on On Delta Interval, or it mixes Initial Only and delta objects | Set Delta Load Run to At Scheduled Time and split the objects into two flows |
| Scheduled runs start failing although nobody changed anything | The schedule owner’s consent has expired | Renew the consent and hand the schedule to a technical user |
| You need to reload an object and Restart Object is not available | With At Scheduled Time you cannot restart an object or repeat the initial load | Remove the object from the flow, deploy, add it back and deploy again; or create an Initial Only flow for the reload |
| You want to pause a scheduled flow and it will not let you | With a schedule, you pause the schedule, not the run | Pause the schedule (for example before S/4HANA downtime) |
| Connection errors when many flows start at once | Too many flows on the same interval exhaust the connections | Stagger the schedules; SAP recommends no more than 100 flows on the same interval |
TF_SD_ORDERS does not offer Initial and Delta, or always loads everything |
Delta Capture is not on for the source or the target | Switch it on for both tables; it cannot be switched on for an already deployed table, so recreate it |
| In production the flow runs 24/7 again | The transport did not include Delta Load Run | Tick Include Delta Load Run in the Transport panel and transport again |
My recommendation
For reporting loads the business uses during working hours, scheduled delta should be the default, and continuous delta the justified exception: operational dashboards, alerts or integrations that genuinely need minutes. Before migrating every flow, start with one: measure run durations and consumed hours for a week and show them to whoever pays the bill. Then review your task chains: you probably have persistence jobs scheduled “at quarter past, just in case” that can now hang off the replication flow instead.
Sources
- SAP Business Data Cloud – release update highlights (SAP Community, Klaus-Peter Sauer)
- Configure the Run Settings of a Replication Flow (SAP Help Portal)
- Working With Existing Replication Flow Runs (SAP Help Portal)
- Sizing, Capacity Planning, and Load Balancing for Replication Flows (SAP Help Portal)
- SAP Datasphere Targets for Replication Flows (SAP Help Portal)
- Capturing Delta Changes in Your Local Table (SAP Help Portal)
- Creating a Task Chain (SAP Help Portal)
- Scheduling Data Integration Tasks (SAP Help Portal)
- Schedule a Data Integration Task (with Cron Expression) (SAP Help Portal)
- Creating a Transformation Flow (SAP Help Portal)
- Create a Graphical View in a Transformation Flow (SAP Help Portal)
- Create or Add a Target Table to a Transformation Flow (SAP Help Portal)
- Watermarks (SAP Help Portal)