Hands-on: SAC data actions driven by story filters
Step-by-step guide to the SAP Analytics Cloud data filter parameter (QRC3 2026): exclusions, dynamic dates and changed-only scoping in data actions.
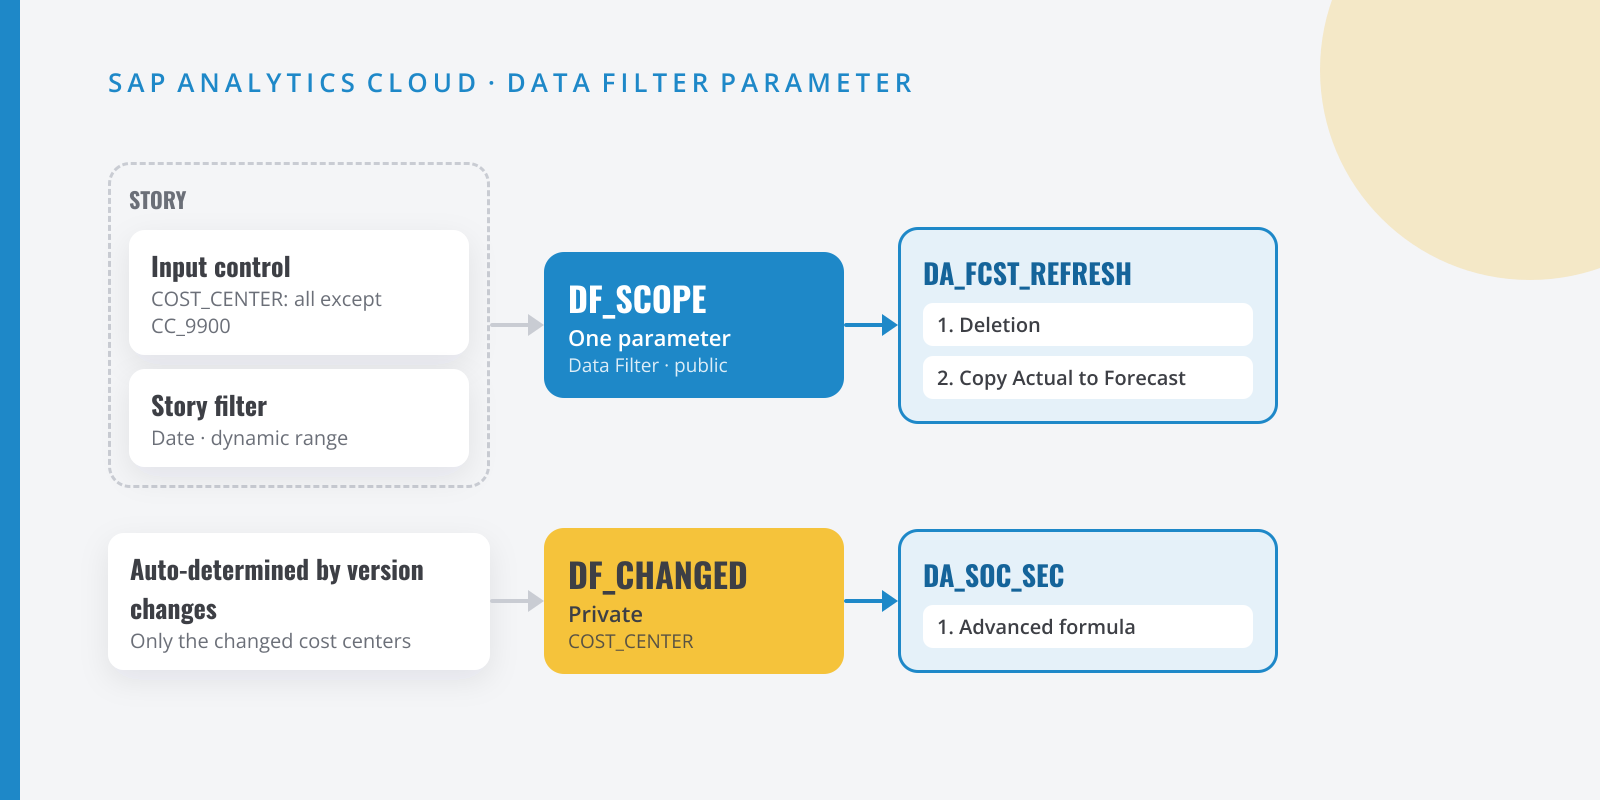
Table of contents
Every SAP Analytics Cloud planning project has the same conversation sooner or later: “I filtered the story to every cost center except the corporate ones, but the data action processed everything”. Until now, data action parameters only understood fixed member lists: no exclusions, no dynamic date ranges. The Q3 2026 quarterly release adds the data filter parameter, which hands the filter to the data action exactly as the user sees it. In this hands-on I use it for a forecast refresh and for a calculation that only runs on what the user actually changed.
What we are going to build
By the end you will have:
- A data action
DA_FCST_REFRESHthat deletes and re-copies actuals into the Forecast version, scoped by the story: a cost center input control with an exclusion and a dynamic date filter, both passed in one parameter,DF_SCOPE. - A story starter that passes both filters to the data action without a single line of script.
- A second data action,
DA_SOC_SEC, that recalculates social security costs only for the cost centers the user changed, using a private parameter,DF_CHANGED, that fills itself.
The cover image sums up the setup. All technical names (PLN_OPEX, COST_CENTER, CC_9900…) are examples: use your own naming convention.
So you can reproduce it from scratch, the guide starts by building the expense planning model PLN_OPEX from two sample CSV files with fictitious data, in euros:
- PLN_OPEX_ACTUAL.csv: actuals from January to September 2026 (216 rows).
- PLN_OPEX_FORECAST.csv: the forecast from January to December 2026 (288 rows).
Both have the same columns: DATE (yyyymm format), ACCOUNT and ACCOUNT_DESC (salaries, social security, travel and rent), COST_CENTER and COST_CENTER_DESC (six cost centers) and AMOUNT. Cost center CC_9900 holds corporate overhead (central services: executive management, legal, audit…). It is not planned in this process: central controlling sets it, so the refresh must not touch it. In actuals, social security is about 31.2% of salaries; in the forecast it is 30%. That gap helps you see what each data action recalculates.
Why it is worth it
The member parameter has three limits that anyone who has built a starter knows well. It does not accept exclusions (“everything except…”). It does not accept ranges or advanced filters. And if you fill it from a script, from the Q2 2027 release SAP will block execution when a parameter exceeds 1,000 members (on tenants that never exceeded it, the limit has applied since Q2 2026). The usual outcome is a data action that processes more data than needed, or a script that builds huge member lists.
| Aspect | Member parameter | Data filter parameter |
|---|---|---|
| Dimensions per parameter | One | Whatever the story passes (up to 100 filters) |
| Exclusions and date ranges | No | Yes, with the story filter’s semantics |
| 1,000-member limit | Yes | No, because it does not pass a static list |
| Scope is decided in… | The data action | Each story’s starter |
| Filled with the user’s changes | No | Yes, with “auto-determined by version changes” |
My take: the data filter parameter does not replace member parameters when the value is a target (the target version, the account you copy to). It replaces the parameters that only existed to narrow the scope, which is most of them.
Step by step
Step:Create the PLN_OPEX planning model
In the Modeler, click + (new model) and choose Start with an empty model. SAC creates a model with an open structure, planning capabilities enabled and the Date and Version dimensions. Keep planning enabled and leave currency conversion off: this guide does not need it.
- Date: select it and, in the side panel, set the timeline from January to December 2026 (From / To) with month granularity.
- Dimensions: add two generic, private dimensions with a dimension table:
ACCOUNTandCOST_CENTER. I use a generic dimension for accounts, not an Account-type one, to keep structure priority between accounts and measures out of this guide. - Measure: add
AMOUNTas Decimal with 2 decimal places, Sum aggregation and, under Units & Currencies, unit type Currency with a fixedEURcurrency.
Save the model as
PLN_OPEX. Take your time: some model settings cannot be changed once it is saved.Then create the forecast version. Select the Version dimension, open Edit Dimension Table and add a line with the description
Forecastand the category Forecast. The system derives the ID from the description. The Actual version already exists by default. Save.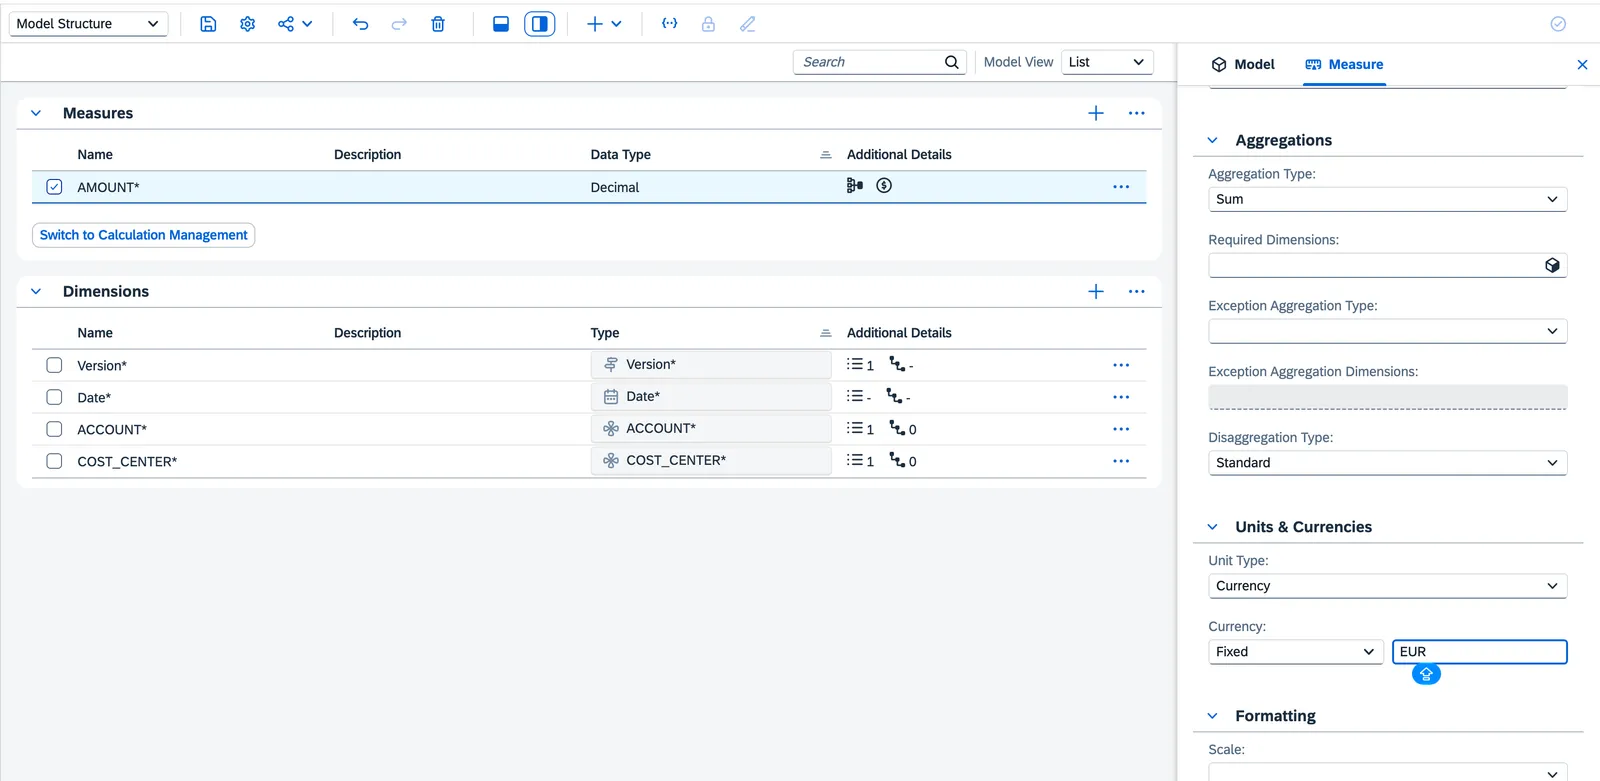
PLN_OPEX Model Structure: the AMOUNT measure (Decimal, Sum, fixed EUR currency) and the four dimensions. Step:Load the sample data
Download both CSV files. Open
PLN_OPEX, go to the model’s Data Management and choose Import Data from → File. SelectPLN_OPEX_ACTUAL.csvand click Set up import.There is nothing to transform in data preparation. In the mapping:
DATE→ Date. In the Map to Facts step, click Review Settings on the Date target and check that the source format isyyyymm.ACCOUNT→ACCOUNTandCOST_CENTER→COST_CENTER.AMOUNT→AMOUNT.- Version: the file has no version column, so use Set Default Value and pick
public.Actual. - Attributes, in the Map Properties step:
ACCOUNT_DESCas the description ofACCOUNTandCOST_CENTER_DESCas the description ofCOST_CENTER. SAC tells you how many new members it creates in each dimension: 4 accounts and 6 cost centers.
Review and run the import. Repeat with
PLN_OPEX_FORECAST.csv, this time withForecastas the default version.Check the
AMOUNTtotals before moving on: 3,392,486.60 in Actual and 4,588,128.00 in Forecast. If they do not match, look at the import’s rejection summary; it is almost always the date format.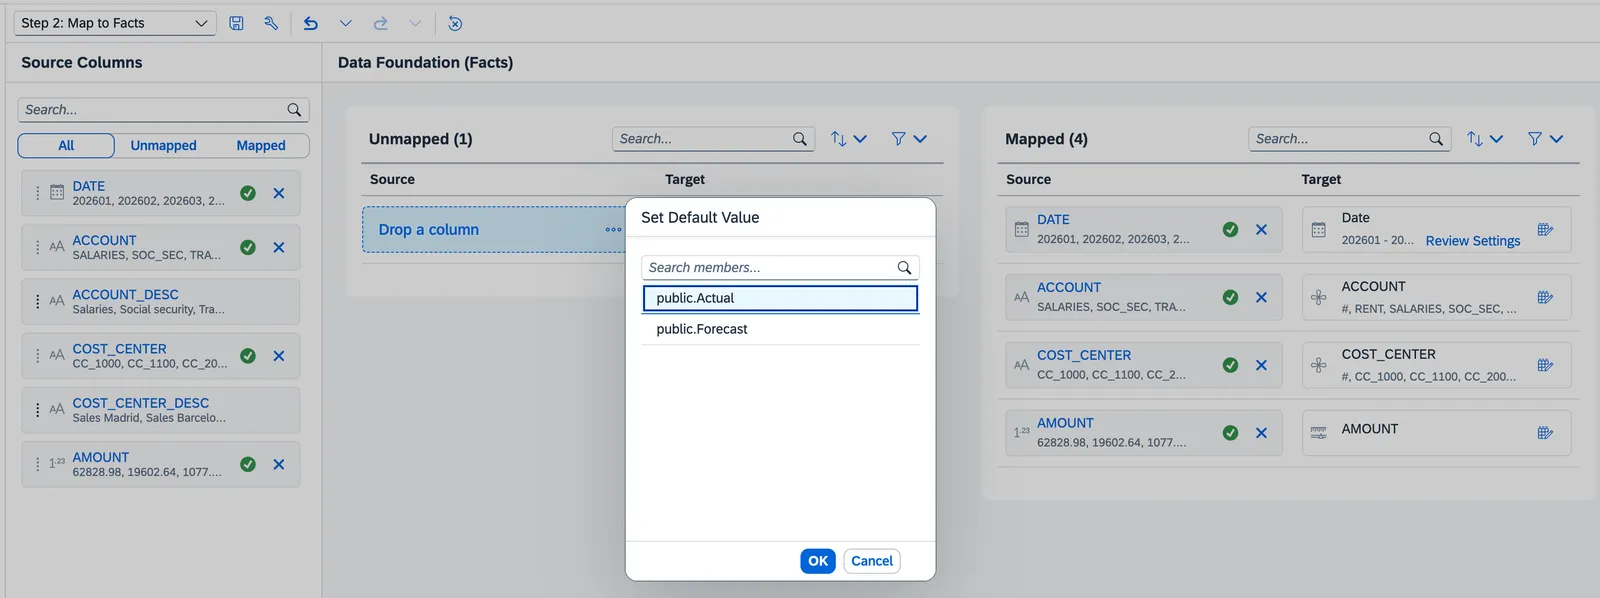
Map to Facts: the four columns mapped and Set Default Value with public.Actual for the version. Step:Create the data filter parameter in the data action
Create the data action
DA_FCST_REFRESHwithPLN_OPEXas its default model. Open the parameter list with Show Parameters List and choose Create Parameter:- ID:
DF_SCOPE(letters, numbers and underscores only). - Parameter Type: Data Filter.
- Model:
PLN_OPEX. - Visibility: Public, so the starter can assign filters to it.
- Name for Prompt: “Story scope”.
Notice what it does not ask for: no dimension, no hierarchy, no members. That is what makes it different. The parameter is a slot for filters; which filters go into it is decided later, in each story’s starter. The same data action can receive only cost centers from one story and cost centers plus dates from another.
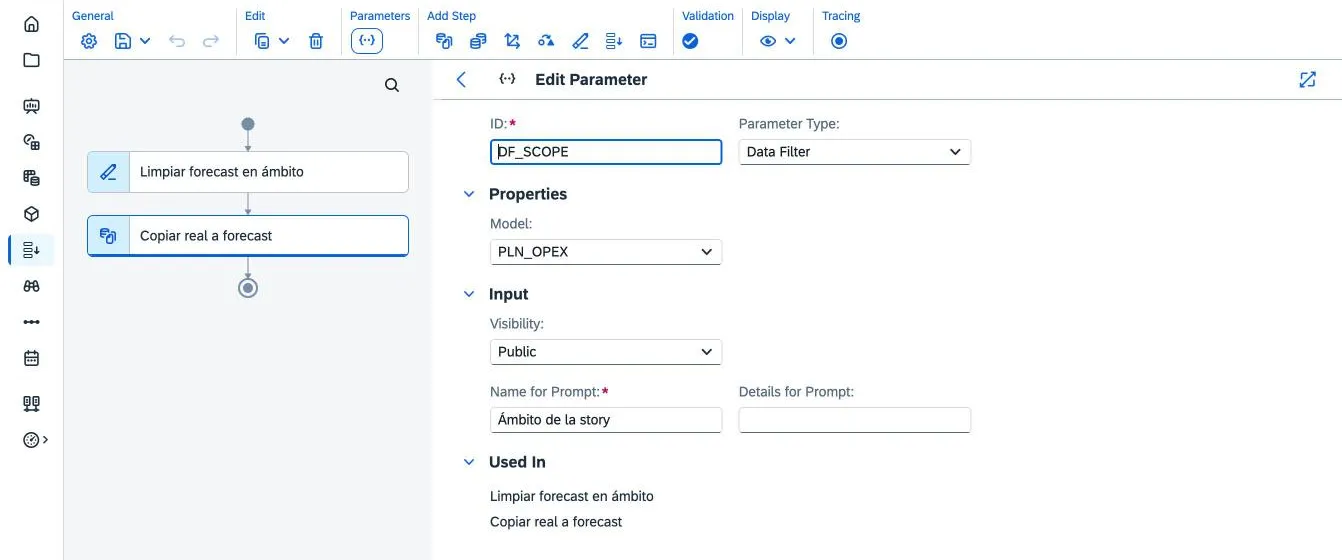
DF_SCOPE: Data Filter type, model PLN_OPEX and no dimension or members to pick. The prompt name in the screenshot is the Spanish one. - ID:
Step:Use the parameter in the step context
The parameter goes into the filter area (the context) of copy, cross-model copy, currency conversion, deletion and structured allocation steps. We add two steps:
- Deletion step “Clear forecast in scope”: it already has the filter Version =
TargetVersion; use Add Filter to addDF_SCOPE. Keep Delete Mode on Delete Facts. It deletes target version data within the scope coming from the story. - Copy step “Copy actuals to forecast”: under Filters, set Version =
Actualand addDF_SCOPE. No copy rules are needed: if you filter the source version and leave everything else alone, data is copied to the same members in the target version (set by theTargetVersionparameter).
Order matters. If you copy without deleting first, combinations that had a forecast but no longer have actuals are left orphaned in Forecast. And this is the point of the exercise: a deletion step is exactly where you do not want an approximate scope. With a member parameter you would have to pass every cost center except
CC_9900one by one. With the data filter, the exclusion arrives as is.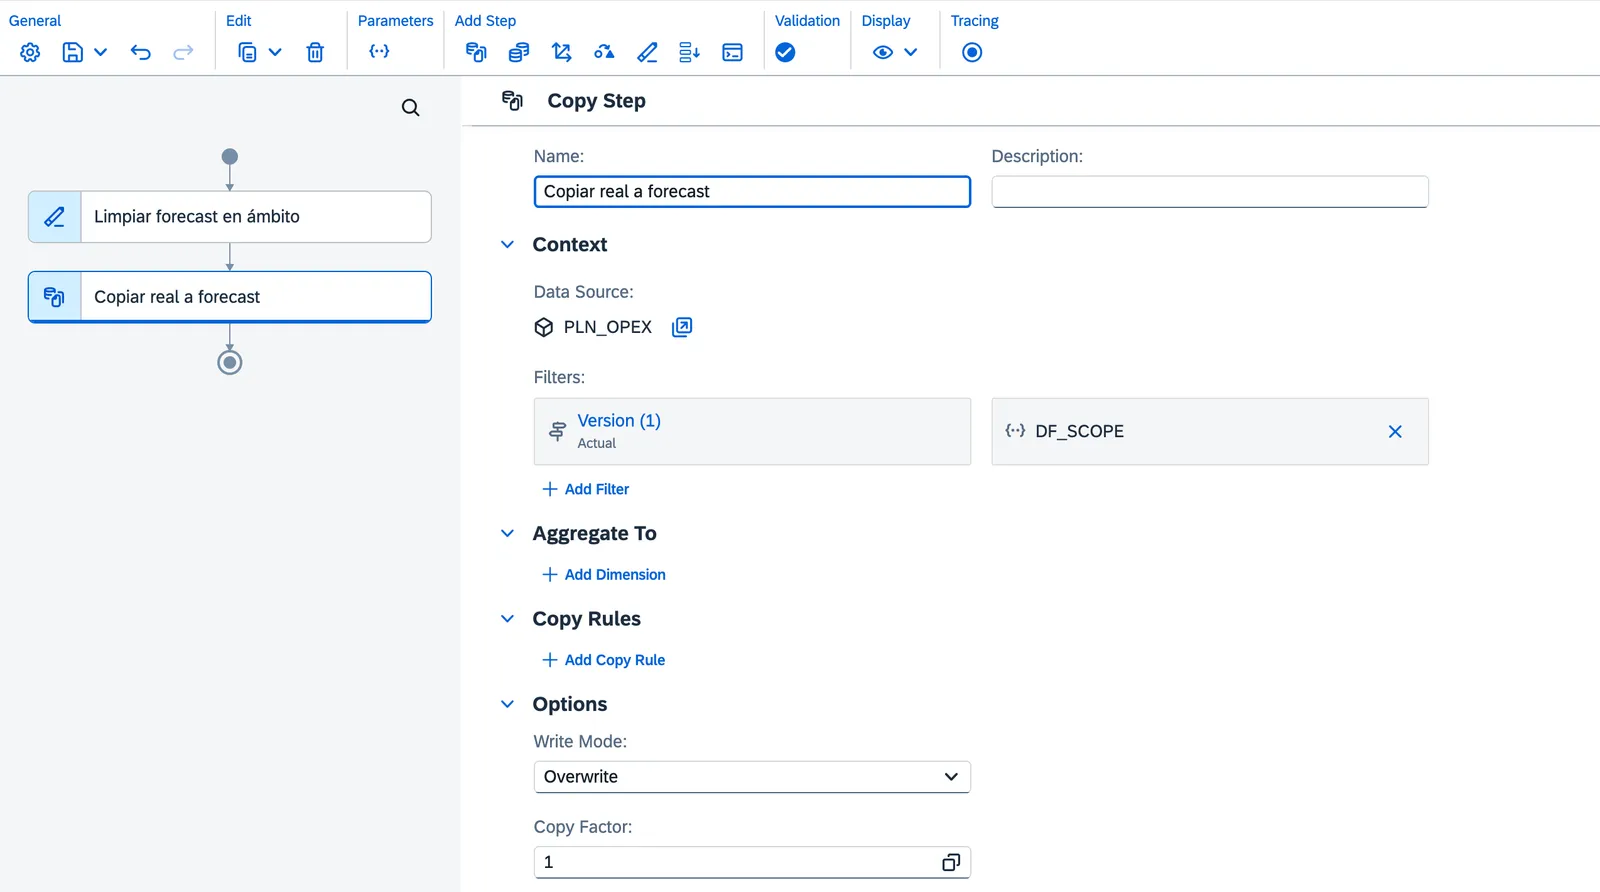
Copy step: Version = Actual and DF_SCOPE under Filters, no copy rules (step names in Spanish in the screenshot). - Deletion step “Clear forecast in scope”: it already has the filter Version =
Step:Prepare the story: input control with an exclusion and dynamic dates
Create a story on
PLN_OPEXwith a table for validation and two page input controls, which are the filters we will hand to the data action:- Table:
COST_CENTERin rows and Measures plus Version in columns.PLN_OPEXis a model with measures, so the table needs an explicit measure: addAMOUNT. One catch: when you insert the table, SAC adds a table filter Version = Actual (“1 Filter” in the header). Remove it to see both Actual and Forecast. - Cost centers: Insert → Input Control → Dimensions →
COST_CENTER→ Filter by Member. Select All Members and clearCC_9900(Corporate overhead). That way the filter is defined as an exclusion, not as a member list. The control keeps showing “(All)”, but the exclusion applies: Corporate overhead disappears from the table. - Dates: Insert → Input Control → Add Time Filters → Current → To Previous Date → Year. The control shows “Current Year”. Its Set Date Range for Date dialog holds the definition: Ranges Type Dynamic, Range Type Standard, Granularity Current Year and End at Previous Month (the other options are Previous Year and Previous Quarter), with the Year, Quarter, Month hierarchy. In other words, from January up to the month before the current one.
With the sample data the range should be January–September 2026. If you follow the guide at a different date, set a custom current date: in that same dialog, under Date Type, choose + Create Custom Date… (Custom Date / Time Interval, Day granularity, 1 October 2026). The range becomes “Current Year (Jan, 2026 - Sep, 2026)”.
For the validation you will need to publish or discard version data: the Publish Data button sits in the story’s extended toolbar, and its dropdown includes Revert Data.
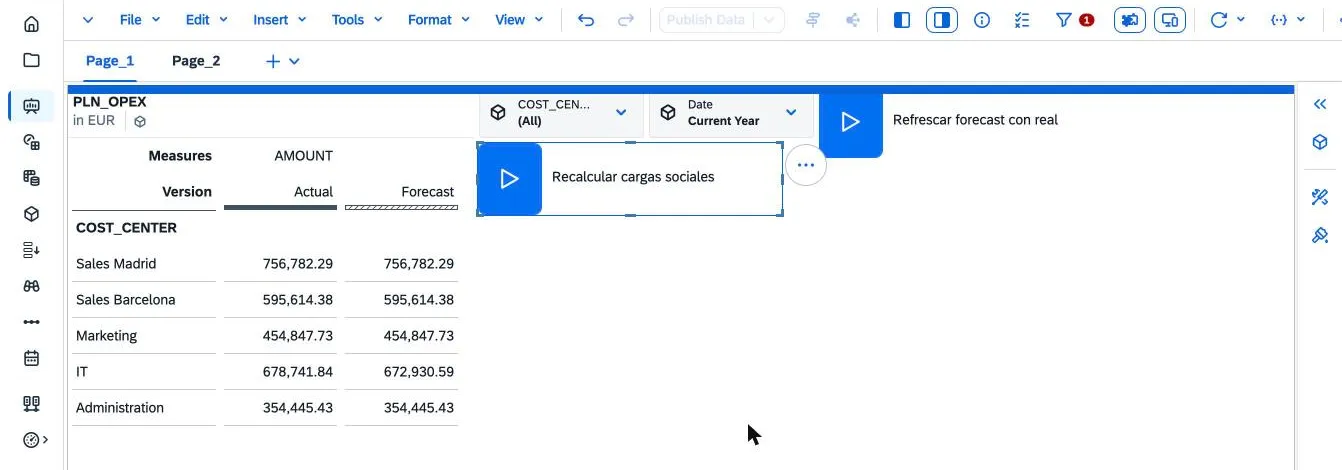
The finished story: Actual vs. Forecast table, the two page input controls and the two starters (labels in Spanish). 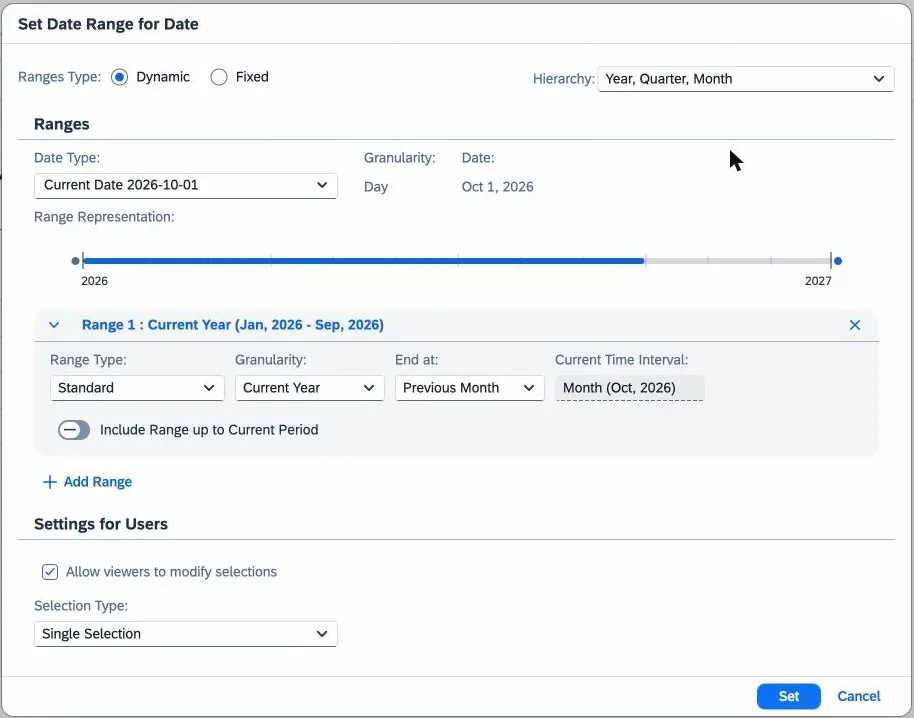
Set Date Range for Date: Current Year up to Previous Month, with the custom current date under Date Type. - Table:
Step:Set up the starter and assign the filters
Add the starter with Insert → (+) → Starters → Data Action Starter, label it “Refresh forecast with actuals” and, in the Builder panel, select
DA_FCST_REFRESH:- Default strategy if target version isn’t in edit mode: Automatic Planning Area.
- Publish to target version after execution: Do not publish. I would keep it that way: the planner reviews the result and publishes it.
- Under Parameters, Target Version: Input Fixed Value with value
public.Forecast.
On the “Story scope” parameter (
DF_SCOPE), Add Filter opens the Select Filters dialog with the page’s input controls: tickCOST_CENTERand Date. One parameter receives both filters; the starter accepts up to 100 story or input control filters per parameter.If the data action runs inside a multi action, there is one more step: create a data filter parameter in the multi action and link it to
DF_SCOPEin the data action step. Otherwise the filter never arrives.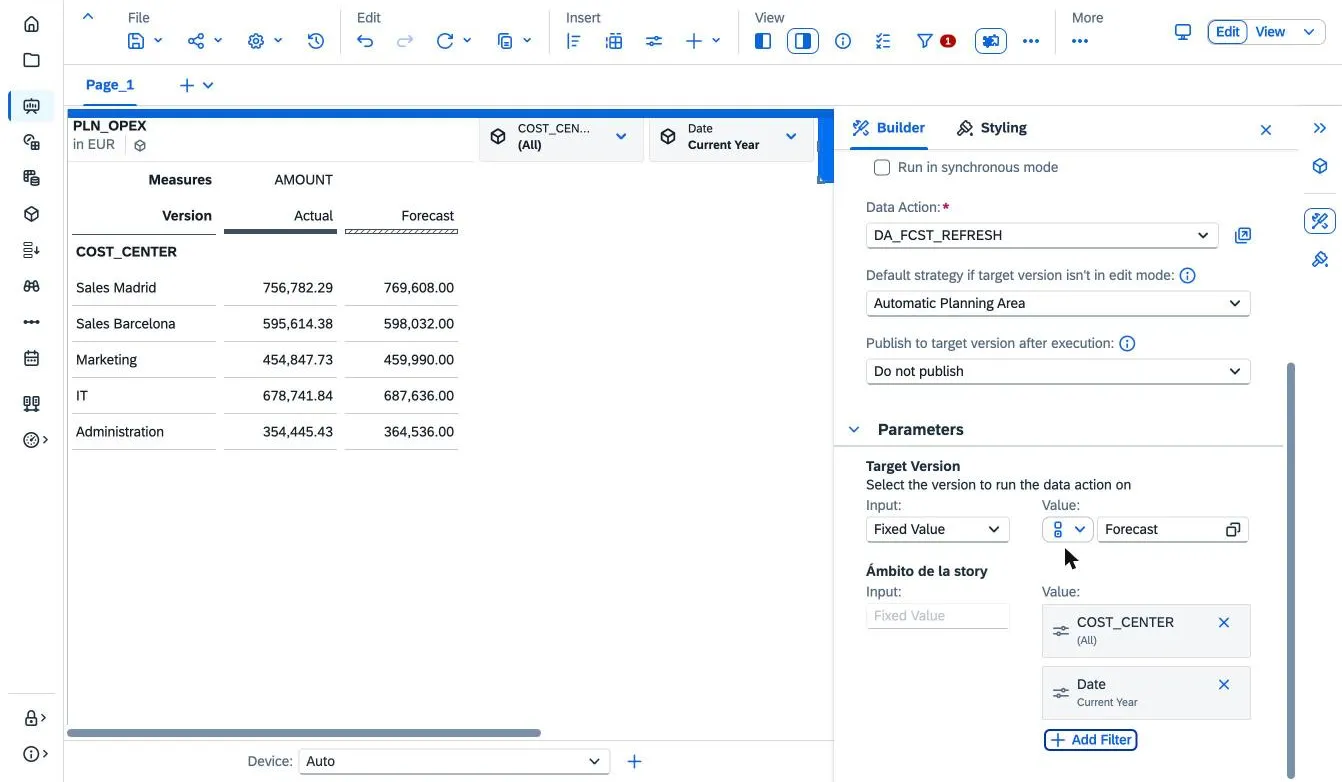
Refresh starter: fixed target version and both input controls assigned to DF_SCOPE. Step:Create a private parameter that detects changes
Part two. Create the data action
DA_SOC_SEConPLN_OPEXand a new parameter:- ID:
DF_CHANGED. - Parameter Type: Data Filter.
- Visibility: Private.
- With Add Filter, pick COST_CENTER → Auto-determined by version changes.
The filter token reads Based on changes in “TargetVersion”: by default it looks at the target version. You can change that by selecting the token. When the data action starts, SAC checks which cost centers have changes in that version and passes them to the parameter.
Do not add dimensions “just in case”. With
COST_CENTERandACCOUNT, the scope is the Cartesian product of the changed members of each. And if the total number of changed members gets too large, SAC stops the run. Pick dimensions where users typically touch few members.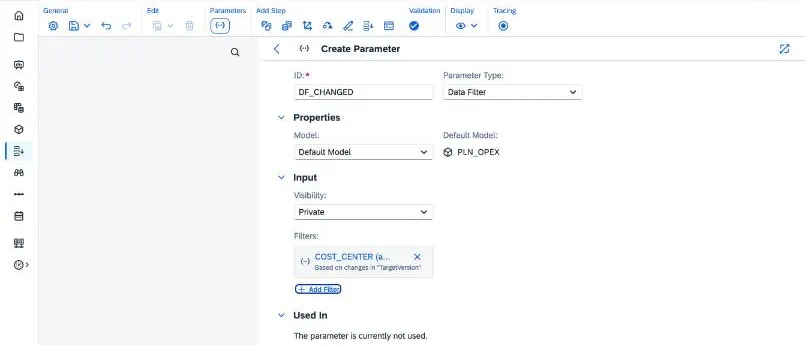
DF_CHANGED: private, with the COST_CENTER filter “Based on changes in TargetVersion”. - ID:
Step:Use it in an advanced formula
Add an advanced formula step, “Social security”. In advanced formulas, the data filter parameter is declared with two
CONFIGlines before the formula: which parameters are active and which of their dimensions apply. The second one plays the role of aMEMBERSETonCOST_CENTER.DA_SOC_SEC · Social security CONFIG.DATA_FILTER_PARAMETERS = %DF_CHANGED%CONFIG.DATA_FILTER_DIMENSIONS = [d/COST_CENTER]MEMBERSET [d/ACCOUNT] = ("SALARIES", "SOC_SEC")DATA([d/ACCOUNT] = "SOC_SEC") = RESULTLOOKUP([d/ACCOUNT] = "SALARIES") * 0.30The 30% rate is an example; in a real project it would come from an assumptions account or a number parameter. Two details from the documentation worth knowing:
- Unlike copy or deletion steps, which apply every dimension in the filter, an advanced formula only applies the dimensions you list in
CONFIG.DATA_FILTER_DIMENSIONS. - Advanced formulas use the dimension’s default hierarchy, whatever the filter uses. If you reference members of that dimension in
DATA()orRESULTLOOKUP(), or the filter is asymmetric, also setCONFIG.HIERARCHY.
Click Validate: the formula should validate cleanly (“No errors found”).
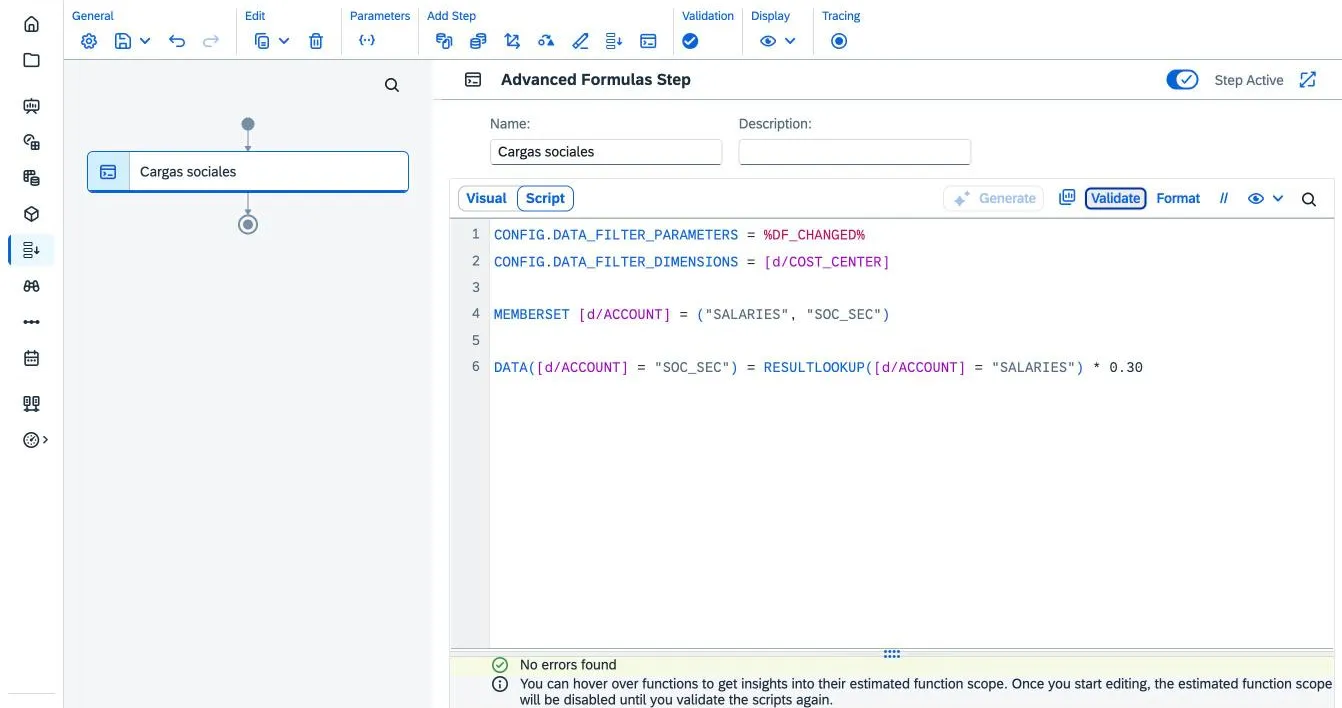
The social security step validates without errors. Add a “Recalculate social security” starter to the story with target version
Forecast.DF_CHANGEDis private, so the user is not prompted.- Unlike copy or deletion steps, which apply every dimension in the filter, an advanced formula only applies the dimensions you list in
Validation
Do not sign off until you have checked these things, in this order:
-
The exclusion holds. Run “Refresh forecast with actuals”. For the included cost centers, Forecast from January to September must equal Actual.
CC_9900must not change by a cent, and neither must October to December. With the sample data (January–September 2026,AMOUNT):Cost center Actual Forecast before Forecast after CC_1000756,782.29 769,608.00 756,782.29 CC_1100595,614.38 598,032.00 595,614.38 CC_2000454,847.73 459,990.00 454,847.73 CC_3000678,741.84 687,636.00 678,741.84 CC_4000354,445.43 364,536.00 354,445.43 CC_9900552,054.93 561,294.00 561,294.00 Total 3,392,486.60 3,441,096.00 3,401,725.67 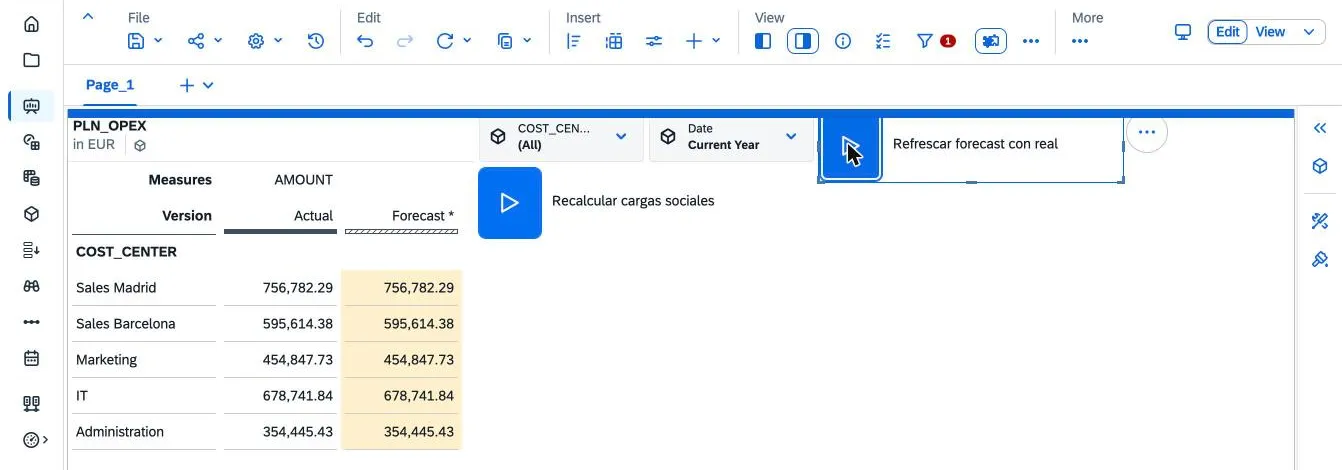
After the refresh, January–September Forecast matches Actual for the five cost centers. -
The Job Monitor agrees. Open the run in the Job Monitor. Under Steps, the deletion step must show 180 records and the copy step another 180: 5 cost centers × 4 accounts × 9 months. That is the objective evidence that the exclusion and the date range reached the data action. Under Parameters, the scope parameter shows
COST_CENTER(All) and Date Current Year: the Job Monitor shows the control’s label, not the member list, so do not read too much into that “(All)”. The real proof is the 180 records.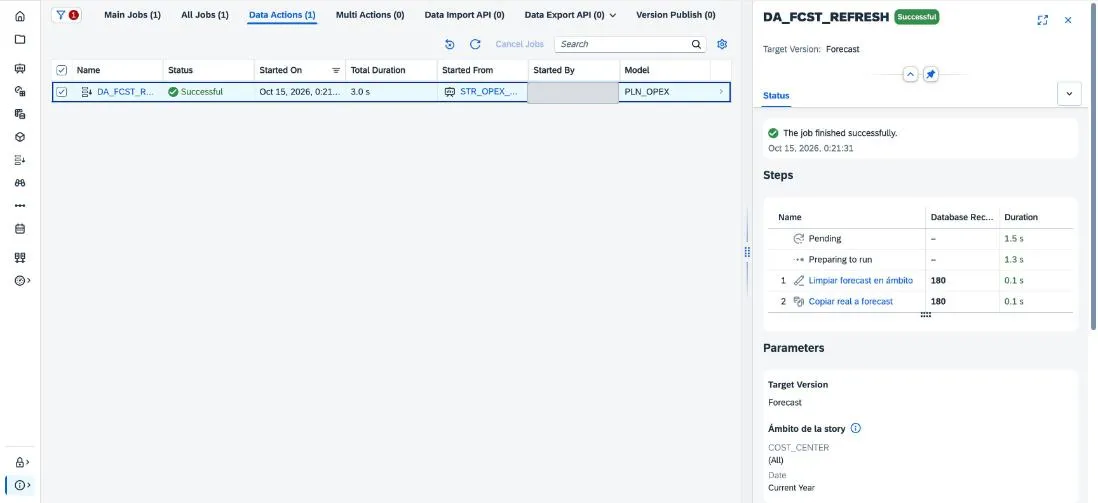
Refresh run in the Job Monitor: 180 + 180 records. Parameters only show the control labels. -
Publish before moving on. Once the data checks out, publish the Forecast version with Publish Data. If you skip it, what the refresh just wrote counts as version changes and the next test tells you nothing (see the box below).
-
Only changes are recalculated. You are going to change October 2026 salaries in
CC_3000from 55,080.00 to 60,000.00, and the table on the first page cannot do that. It shows the January–September total per cost center, with neither Date norACCOUNT, and its date filter leaves October out. If you typed a value there, SAC would spread it across every account and month in scope. And you should not touch that filter, because the refresh starter uses it. So I added a second page with a table without those filters:COST_CENTERandACCOUNTin rows (filtered to IT and Corporate overhead) and Version and Date in columns. On Date, right-click → Select Hierarchy → “Show only leaves in widget” to see the months without subtotals. PutForecastin edit mode and change the October salaries cell there.Run “Recalculate social security”. In the Job Monitor, under Parameters, the Auto-determined by version changes section must list only
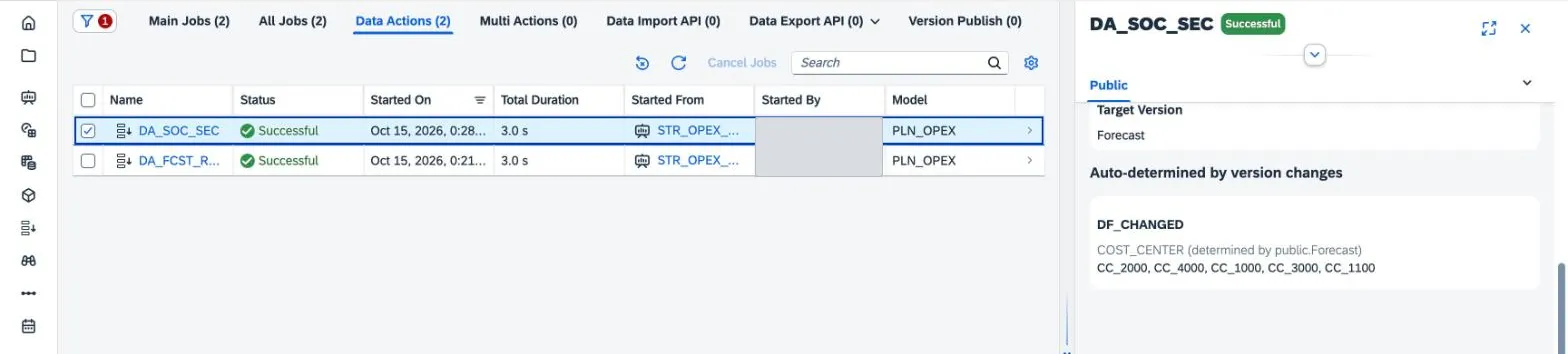
CC_3000, and the social security step 12 records. There, OctoberSOC_SECgoes from 16,524.00 to 18,000.00. Look at January–September too: it goes from 151,091.47 (the 31.2% copied from actuals) to 145,280.22. Because we only track the cost center, every month ofCC_3000is recalculated, not just October. If you also want to narrow the month, add Date to the change filter, keeping the Cartesian product in mind. Other cost centers are untouched: in the main table, IT’s January–September Forecast ends at 672,930.59.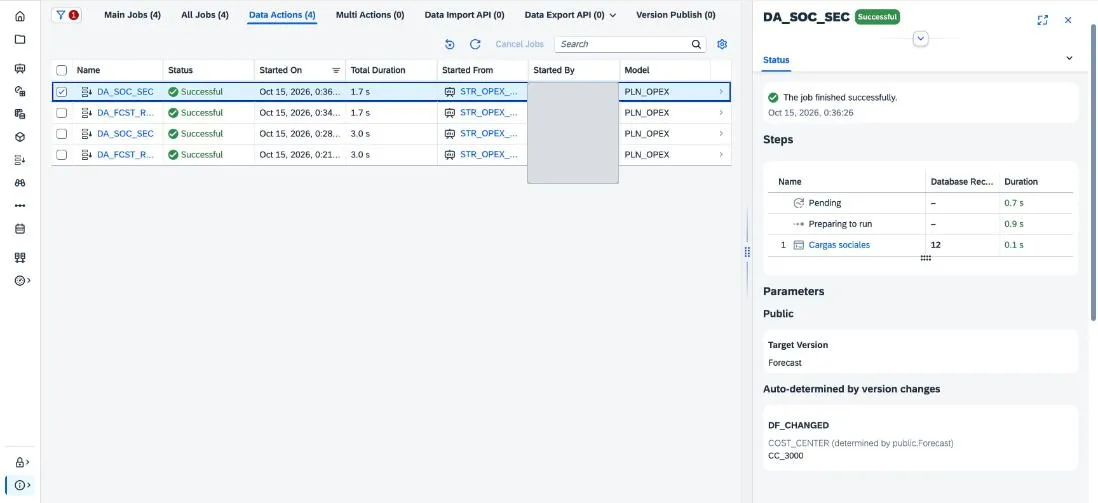
With the version published before editing, DF_CHANGED receives only CC_3000 and the step writes 12 records. 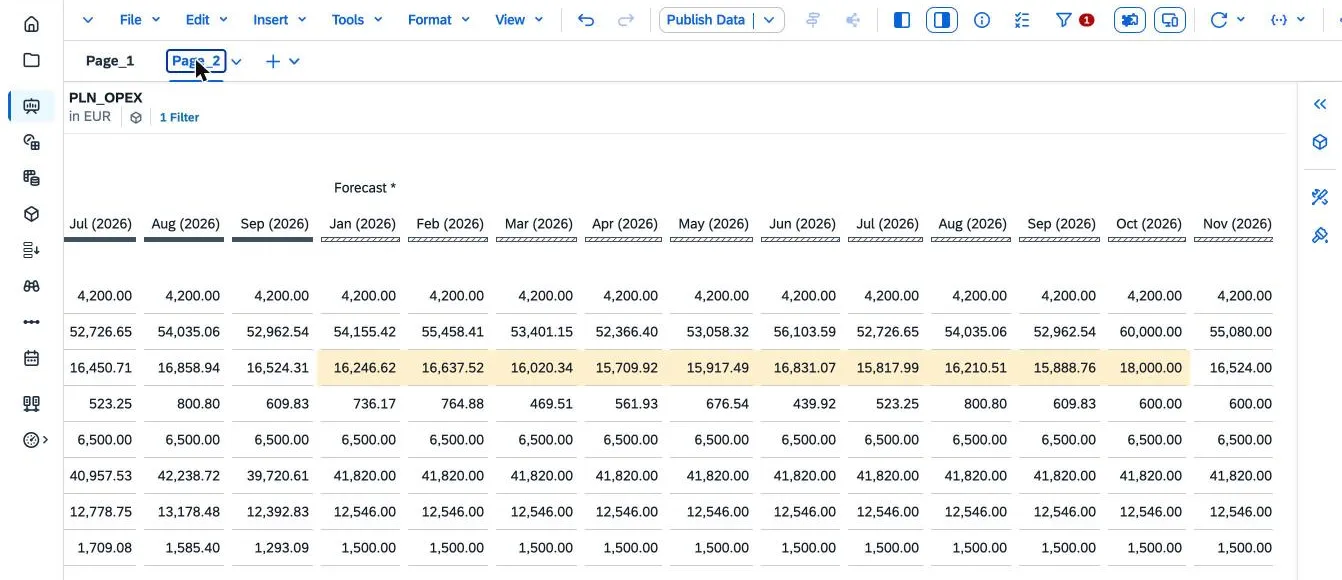
Second page, IT Forecast: the social security row recalculated in every month, with 18,000.00 in October. -
No changes, no effective run. Publish the version and run
DA_SOC_SECagain. With no changes in the version, the Job Monitor showsDF_CHANGED“(No change detected)” and the step writes 0 records. That is expected behaviour, not an error.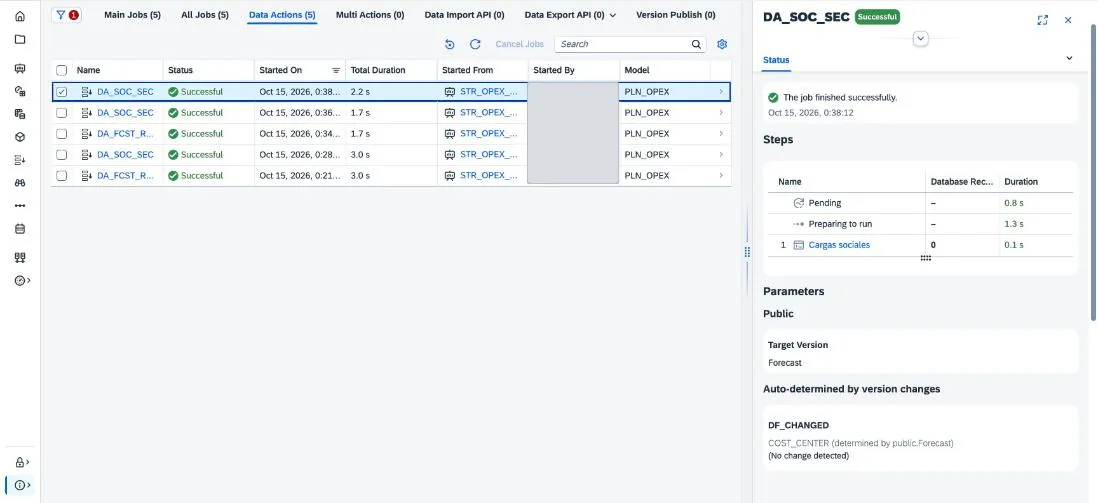
After publishing, with no changes in the version: “(No change detected)” and 0 records.
Common mistakes
| Symptom | Cause | Fix |
|---|---|---|
| The starter warns that the filter is not supported | It is a member parameter: no exclusions, no ranges, no more than 100 members | Switch the parameter to Data Filter and reassign the filters in the starter |
| Warning or error for exceeding 1,000 members | A script passes a large list to a member parameter | Assign the input control to a data filter parameter, which has no such limit |
| Inside a multi action, the data action processes all data | The data action’s data filter is not linked to a multi action parameter | Create a data filter parameter in the multi action and link it in the step |
DA_SOC_SEC recalculates cost centers the user did not touch |
The version has unpublished changes from another data action (for example, the refresh) | Publish the version before data entry starts, or check in the Job Monitor which members arrived under Auto-determined by version changes |
DA_SOC_SEC does nothing |
No changes in the reference version (or it was published before the run) | Check the filter’s version and the Job Monitor section |
| The run stops because of too many members | Too many dimensions in the change filter: the scope is a Cartesian product | Keep only dimensions with few changed members (cost center, product…) |
| The advanced formula writes to unexpected nodes | It uses the default hierarchy, not the filter’s | Set CONFIG.HIERARCHY for that dimension |
| The import rejects rows | DATE was not read as yyyymm or no version was assigned |
Check the format in the mapping’s Review Settings and the default version |
Next step
Take stock of your starters and scripts: every member parameter that only narrows the scope is a candidate for a data filter. I would start with two groups: the ones that force users to reselect by hand what they already filtered in the story, and the scripts that build long member lists, which have an expiry date in Q2 2027. I would keep the change filter for expensive calculations that users trigger after data entry. That is where you will see the runtime gains.
Sources
- Create a Model from Scratch (SAP Help Portal)
- Add, Delete, and Edit Dimensions and Measures (SAP Help Portal)
- Import and Prepare Fact Data in a Standard Model (SAP Help Portal)
- About Date and Time Range Filters (SAP Help Portal)
- About the Filter By Member Dialog for Story and Page Filters (SAP Help Portal)
- Add Parameters to Your Data Actions and Multi Actions (SAP Help Portal, Q3 2026)
- Set Up Starters (SAP Help Portal)
- Add Steps to Your Data Actions (SAP Help Portal)
- Understand General Rules for Advanced Formula Calculations for Planning (SAP Help Portal)
- What’s New – 2026 Releases (SAP Help Portal)
- Improved Data Action scoping with the new Data Filter Parameter type (SAP Community)
- Context Aware Data Action Scoping (SAP Community)
- Upcoming Change: Member Limit Enforcement for Data Action Parameters (SAP Community)
- The release cycle of SAP Analytics Cloud in 2026 (McCoy & Partners)